Recipes & Cooking: My Foolproof Sourdough Bread Recipe
Original content posted on Grounded Grimoire here.
Why I Love This Recipe
I’ll be honest — sourdough bread intimidated me for years. The forums, the jargon, the elaborate schedules. Then I simplified everything down to what actually matters, and suddenly I was pulling gorgeous, crackly loaves out of the oven every week. This is that stripped-down, foolproof sourdough bread recipe.
A huge thank you to Emilie at The Clever Carrot, whose beginner’s guide taught me the fundamentals I still rely on today. I’ve also linked to an excellent sourdough starter tutorial from Feasting at Home for those who want a deeper dive into the science of fermentation.
Here, I’m keeping it practical: make your starter, make your bread, enjoy your life. Let’s go.
Ingredients
80–100 grams active sourdough starter
350 grams warm filtered water
500 grams bread flour
10 grams sea salt
Optional: You can infuse different herbs, spices, and cheeses into your sourdough bread recipes. But I love a good old fashioned plain sourdough loaf!I even treat my starter to some moon water every once in awhile.
Instructions
Mix: In a large bowl, dissolve your sourdough starter in the warm water. Add the bread flour and sea salt, and mix until no dry flour remains. Cover and let rest for 30–60 minutes (this is called the autolyse).
Bulk ferment: Over the next 3–4 hours, perform 4–6 sets of stretch-and-folds, spaced about 30 minutes apart. To do one set: grab one side of the dough, stretch it up, fold it over to the other side. Rotate the bowl a quarter turn and repeat until you’ve done all four sides. Cover between sets.
Shape: Turn the dough out onto an unfloured surface. Shape it gently into a round (boule), building surface tension as you go. Place seam-side up into a floured proofing basket (banneton) or a bowl lined with a well-floured kitchen towel.
Cold proof: Cover tightly and refrigerate overnight, or for up to 16 hours. This slow, cold proof deepens the flavor and makes the dough easier to score.
Preheat: About an hour before you want to bake, place your Dutch oven (with lid) in your oven and preheat to 450°F (230°C). Don’t rush this — you want that pot screaming hot.
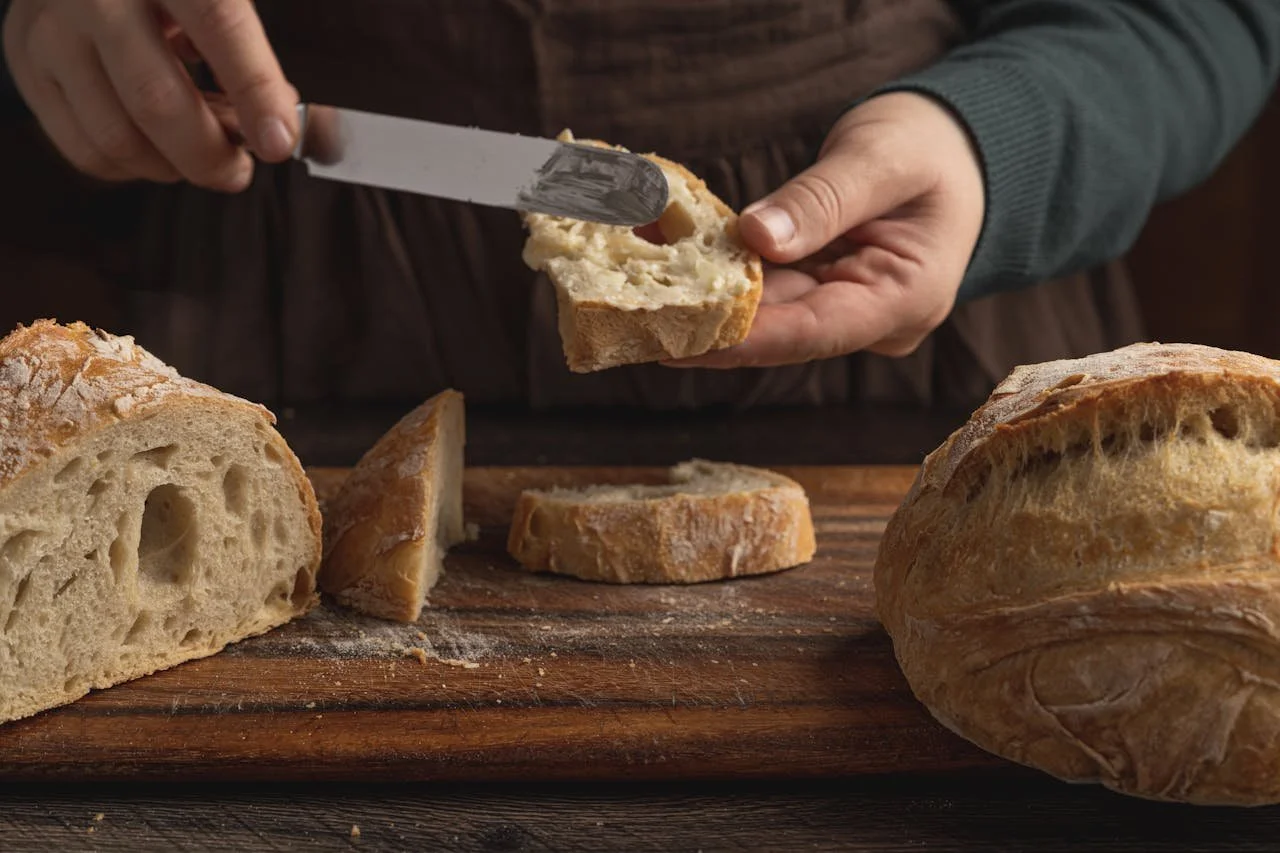
Score and load: Remove the dough from the fridge. Dust flour generously over the top. Carefully tip the dough out onto a piece of parchment paper, floured side down. Score the top with a sharp knife or bread lame. Lower the dough (parchment and all) into the hot Dutch oven and put the lid on.
Bake covered: Bake with the lid on for 25 minutes. This steams the loaf and lets it spring up beautifully.
Bake uncovered: Remove the lid and continue baking for another 25–30 minutes, until the crust is a deep, caramelized brown. Don’t pull it too early — that color is flavor.
Cool: Transfer to a wire rack and resist cutting into it for at least 1 hour. The crumb is still setting. It’s the hardest part. You can do it.
Baker’s Note Your bread is done when the crust sounds hollow when tapped on the bottom. If you have an instant-read thermometer, the internal temperature should read around 205–210°F. And that dusting of flour on top before baking? It’s not just decorative — it helps the score stay open and gives the crust a beautiful rustic look.
Step 1: Make Your Sourdough Starter
A sourdough starter is just flour and water, left to ferment until wild yeast and beneficial bacteria take hold. It sounds almost too simple — and it is. This mixture becomes the living leavening agent that makes your bread rise and gives sourdough its characteristic tang.
Plan for 5–7 days before your starter is ready to bake with. Be patient — it’s worth it.
How to Make Sourdough Starter
Daily Feeding (per feeding)
50 grams whole wheat flour
50 grams warm filtered water
Basic Method
Day 1: Combine 50g whole wheat flour and 50g warm filtered water in a clean jar. Stir vigorously, cover loosely (a cloth or loose lid — not airtight), and leave at room temperature.
Days 2–6: Each day, discard about half of the starter, then feed it with another 50g flour and 50g warm water. Stir well and cover loosely again.
Watch for bubbles, a tangy smell, and a rise-and-fall pattern. When your starter reliably doubles in size within 4–8 hours of a feeding, it’s active and ready to bake with.
Want more detail? For a thorough day-by-day walkthrough — including troubleshooting and video guidance — this sourdough starter guide from Feasting at Home is one of the best resources I’ve found.
Step 2: Bake the Bread
Once your starter is bubbly and active, you’re ready to bake. This recipe uses a Dutch oven to trap steam during the first half of baking — that’s the secret to the shattery, crackly crust that makes a good sourdough unmistakable.
Simple Sourdough Discard Recipes
Every time you feed your starter, you pour some out — and that unfed sourdough discard doesn’t have to go to waste. It adds a mild, pleasant tang to all kinds of recipes. Here are a few of the easiest ways to use it:
Sourdough Pancakes
Stir discard into your usual pancake batter in place of some of the buttermilk or milk. Fluffy, tangy, and delicious.
Sourdough Waffles
Same idea as pancakes — discard adds depth of flavor and makes for wonderfully crispy waffles. My mom used to make these on Sunday mornings with her long-time starter.
Sourdough Crackers
Mix discard with a little olive oil, salt, and your favorite herbs. Roll thin, score, and bake at 350°F until crispy. Addictive.
Quick Breads & Muffins
Swap some of the liquid in banana bread, zucchini muffins, or any quick bread with sourdough discard for extra flavor.
Sourdough Pizza Dough
Add a cup of discard to your pizza dough recipe for a more complex, slightly tangy crust that tastes like it came from a proper pizzeria.
Sourdough Croutons
Use old sourdough bread (or discard-based bread) cubed and toasted in olive oil for the best croutons you’ve ever had.
Frequently Asked Questions
Is sourdough bread gluten free?
No — traditional sourdough is not gluten free. It’s made with wheat flour, which contains gluten. That said, the long fermentation process does break down a significant portion of the gluten proteins, which many people find easier to digest than commercial bread. If you have celiac disease or a serious gluten sensitivity, sourdough is not safe unless you specifically use certified gluten-free flour throughout.
Is sourdough bread healthy?
It’s widely considered one of the healthier bread options available. The fermentation process lowers the glycemic index compared to regular white bread, increases the bioavailability of minerals like iron and zinc, and produces beneficial organic acids. Homemade sourdough also contains no preservatives, dough conditioners, or additives. So, is sourdough good for you? As long as it’s made correctly, yes.
How do I make a sourdough starter from scratch?
Start with equal weights of whole wheat flour and warm filtered water — 50 grams each works well. Stir together in a clean jar, cover loosely, and leave at room temperature. Each day, discard roughly half and feed with fresh flour and water. After 5–7 days of consistent feeding, you’ll have a bubbly, active starter ready for baking. See the full recipe card above, and check out this in-depth guide from Feasting at Home for a video walkthrough.
———
See full article layout and printable recipe here.